
Windows, lenses and LED light pipes are small parts with outsized cosmetic risk: every bubble, flow line, scratch and speck of dust is visible. Clear parts need the right material, a highly polished mold, clean molding and careful handling — all specified up front.
PC vs PMMA
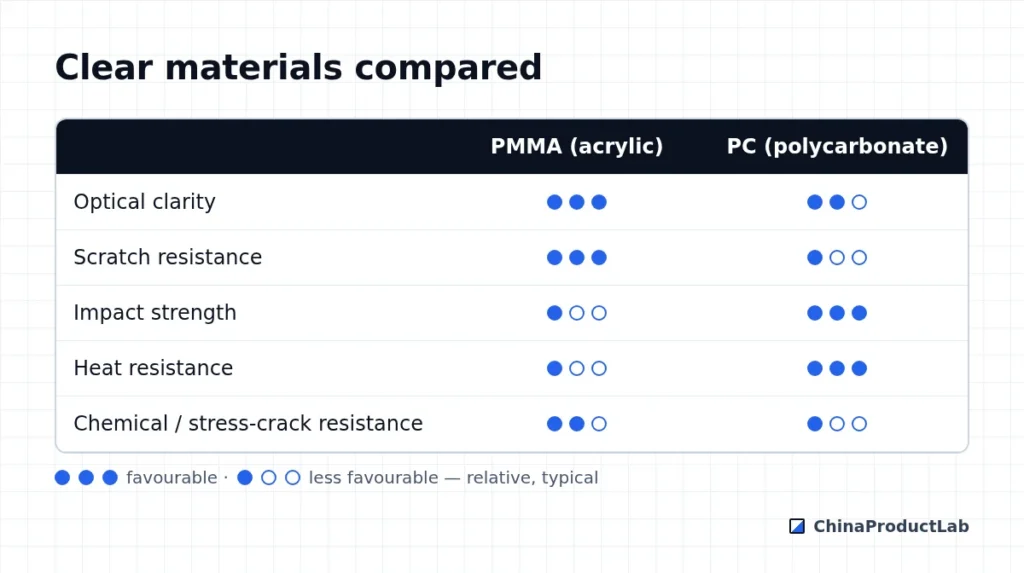
Hard coatings can add scratch resistance to PC; impact-modified acrylics improve toughness. For outdoor parts, choose UV-stabilised grades. Some products also use transparent copolyesters or COC/COP for special needs.
Light pipe basics
- Keep the light path short and straight; every bend loses light
- Bends with generous radii so light stays inside by total internal reflection
- Polished side walls; textured or frosted exit face for even appearance
- Small air gap between LED and light pipe, aligned by features, not by assembly luck
- Block light leaking to neighbouring indicators (light-blocking walls or opaque overmold)
- Test brightness and color with the real LED and housing
Molding and handling
| Issue | Cause | Prevention |
|---|---|---|
| Bubbles / voids | Thick sections, moisture | Uniform walls, proper drying |
| Flow lines, gate blush | Gate design, process | Gate placement out of view, process tuning |
| Black specks | Degraded material, contamination | Clean hopper and barrel, dedicated machines |
| Stress cracking | Molded-in stress, chemicals, screws | Annealing where needed, avoid incompatible cleaners and threadlockers |
| Scratches | Handling and packing | Protective film, trays, gloves |
Design tips for clear parts
- Uniform wall thickness to avoid sink and internal stress
- Gate on a non-visible edge or into a tab that is removed afterwards
- Avoid screws and press fits directly in clear PC, which can crack
- Use draft and highly polished cores so parts eject without scratches
- Allow for optical distortion near thick-to-thin transitions
- Separate light pipes for neighbouring LEDs with opaque walls
Clear parts are often molded on dedicated machines or after thorough purging, because any residue from previous colors appears as specks. Ask the molder how they prevent contamination and whether clear parts are packed in clean conditions directly at the machine.
For windows that must stay clear for years, check the effect of cleaning agents, sunscreen and hand cream on the chosen material, and include those exposures in testing. Chemical stress cracking often appears only after weeks of use.
Packaging and assembly
Many scratches on clear parts happen after molding: during degating, inspection, packing, shipping and final assembly. Protective film applied at the machine, partitioned trays and gloves at every station make a large difference. In assembly, fit windows late in the sequence and remove the protective film as the very last step before packing. Define how many minor marks are acceptable in each zone, so operators do not reject good parts or pass bad ones.
Inspection
Define a viewing standard: light source, distance, viewing time and which zones are critical (e.g. the display window area) versus secondary. Use limit samples for allowable specks and scratches by size. Clear parts often get 100% visual inspection in production, so the standard must be practical for operators.
Related: mold surface finishes, limit samples and plastic materials.