A rubbery grip that peels off after a month, or a brass insert that spins out of its boss — both are molding problems that start in the design. Overmolding and insert molding combine materials in one molded part; done right, they remove assembly steps and look premium.
The two processes
| Overmolding | Insert molding | |
|---|---|---|
| What happens | A second material (often TPE) is molded over a plastic substrate | Plastic is molded around a pre-made insert (metal thread, pin, stamping) |
| Typical uses | Grips, seals, soft-touch areas, bumpers | Threaded inserts, electrical contacts, reinforcements |
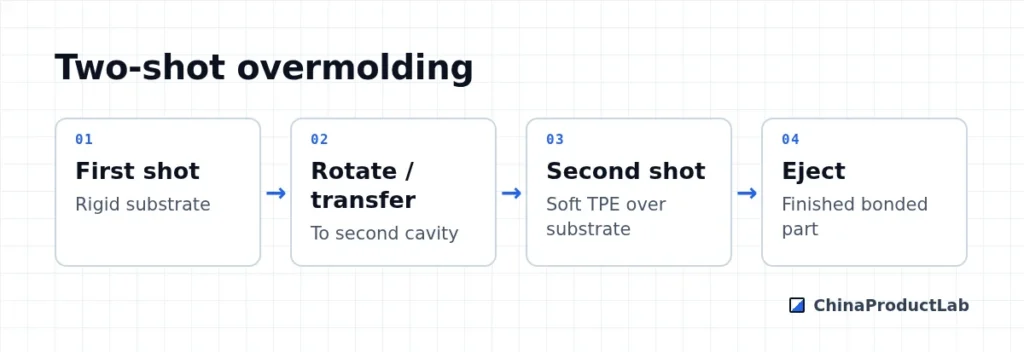
| Methods | Two-shot (one machine, rotating mold) or pick-and-place (substrate moved to a second mold) | Inserts loaded by hand or robot before each shot |
Bonding: chemistry plus mechanics
Overmold adhesion depends on choosing a TPE grade formulated for the substrate (e.g. ABS, PC, PP or PA). Where chemical bonding is weak or uncertain, add mechanical interlocks: holes, undercuts or grooves the soft material flows through. Check the resin supplier’s compatibility data — and test peel strength on samples.
Design rules
- Clear shut-off edges so the soft material does not flash onto the substrate
- Even overmold thickness; avoid very thin edges that peel
- Interlocks for any area that will be pulled or flexed
- Inserts with knurls or grooves to resist pull-out and rotation
- Account for different shrinkage between the materials
- Insert tolerances that fit the mold reliably (loose inserts cause flash, tight ones damage the tool)
Choosing the method and supplier
Two-shot molding needs a dedicated two-barrel machine and a rotating or core-back mold; it gives the best bond and consistency at volume. Pick-and-place overmolding uses two simpler molds and is often the practical route for lower volumes or when the substrate needs machining or decoration in between. Ask suppliers:
- Which TPE grade they propose for your substrate and what bond data supports it
- How peel strength will be tested and what value is acceptable
- For insert molding: how inserts are loaded, located and checked for presence
- How insert supply is controlled — cleanliness and oil on inserts weaken the bond
- What happens to the cycle time and scrap rate compared with a single-material part
Plan at least one round of samples specifically to test adhesion after aging (heat and humidity) — a grip that holds on day one can still peel after weeks in a hot car or a humid bathroom.
Cost and lead-time effects
Combining materials in the mold removes assembly steps, but it changes the economics of the part. Two-shot tools are more complex than single-material molds, take longer to build and need a press with two injection units, which fewer molders have. Pick-and-place overmolding uses simpler tools but adds handling time for every part, and insert molding adds the cost of the inserts plus loading time per shot.
Compare the molded solution with the alternative honestly: a separately molded grip that is glued or snapped on, or a heat-set insert pressed in after molding. At low volumes the post-molding route is often cheaper and easier to change; at higher volumes the integrated part usually wins on labor and consistency. Ask for both quotes when the volume is uncertain, and keep the design flexible enough to move from one route to the other.
Common defects
- Delamination / peeling — incompatible materials, contamination, missing interlocks
- Flash — poor shut-offs or worn tooling
- Cracking around inserts — stress from shrinkage or sharp insert edges
- Short shots on thin overmold areas
More molding rules in design for injection molding and material selection in enclosure plastics. Send your design for a DFM review.