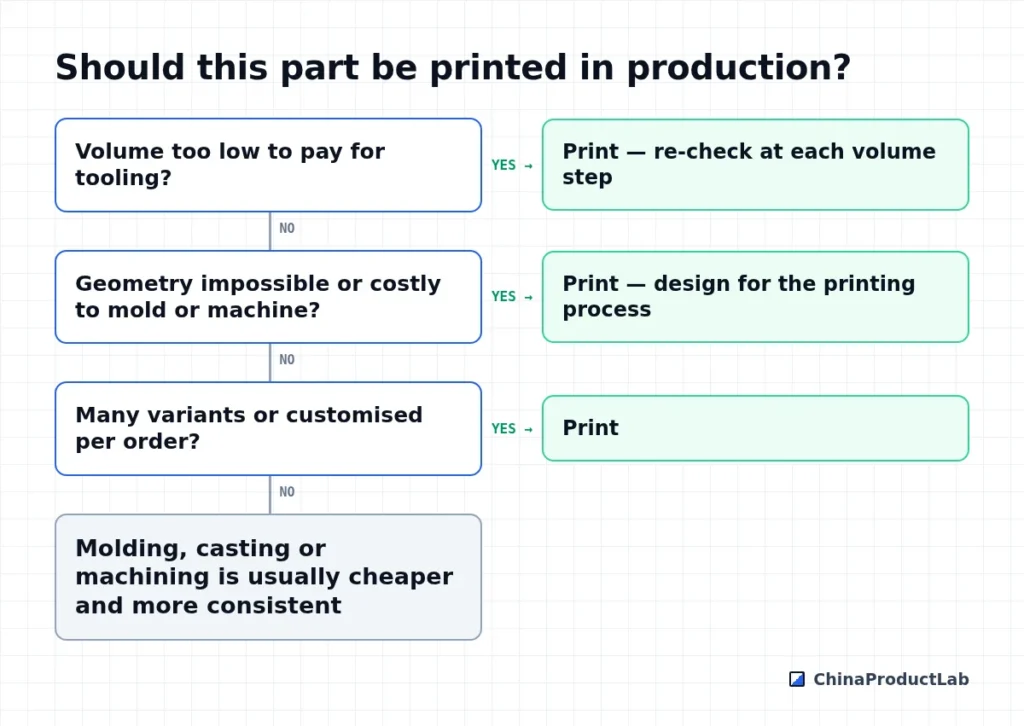
Most teams use 3D printing for prototypes and then move to molding or machining. For some parts, though, printing is the production process: low volumes that do not justify tooling, complex internal channels, customised variants, or spare parts that are needed occasionally for years. Using it well in production means treating it like any other process — with specifications, qualification and inspection.
When printing fits production
Production-grade processes
| Process | Typical production use |
|---|---|
| MJF / SLS (PA12, PA11) | Functional plastic parts, brackets, housings, ducts |
| SLA / DLP (engineering resins) | Small detailed parts, seals and grips with elastomeric resins |
| Metal (laser powder bed fusion) | Complex metal parts, lightweight structures, manifolds |
| FDM (engineering filaments) | Fixtures, jigs, large low-volume parts |
Material properties of printed parts depend on build orientation and process settings. Datasheet values are a starting point; qualify with test parts printed in the production orientation.
Making it repeatable
- Fix the machine type, material, orientation and parameters for each part
- Define finishing: support removal, bead blasting, dyeing, coating
- Specify dimensions and tolerances realistic for the process
- Inspect dimensions and include test coupons for critical parts
- Track build and powder lot for traceability
- Keep approved samples as references for appearance
Qualifying printed parts
Treat a printed production part like any other qualified part. Define the requirements — mechanical loads, temperature, chemical exposure, appearance — and test parts printed with the production settings and orientation. Retest when the machine, material supplier or parameters change.
- First-article inspection on each new print setup
- Test coupons printed with critical builds for tensile or dimensional checks
- Material certificates and powder or resin lot traceability
- Visual standard for surface texture and color variation
- Clear rules for refreshing reused powder
Printed nylon parts absorb moisture and may change dimensions slightly; consider conditioning or sealing for parts with tight fits.
Supplier selection for printed parts
Choose printing suppliers for production differently than for prototypes. Look for consistent machines and materials, documented process parameters, dimensional inspection capability and capacity for repeat orders. Ask how they handle machine maintenance and powder management, and whether they can keep your parts on the same machine type over time.
Design for additive production
Parts designed for molding are often not ideal for printing, and vice versa. When printing is the production process, use its strengths: consolidate several parts into one, add internal channels, lattice structures for weight reduction and integrated clips. Avoid large flat areas that warp and unsupported overhangs that need extensive support removal. Design for the process you will actually use.
Cost and transition
Printed unit cost depends mainly on part volume, build height and finishing, and it stays relatively flat with quantity. As demand grows, compare it regularly with molding or casting, including tooling. Many products use printing for the first months after launch, then move stable parts to tooling while keeping printing for spare parts and variants.
Related: 3D printing processes compared, bridge tooling and 3D printing.